|
Layout Process 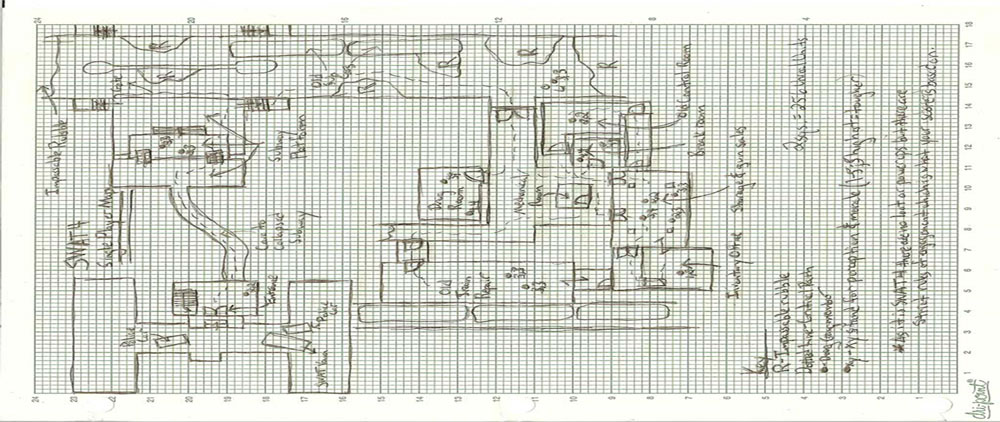 To layout the SWAT 4 map I started with the premise that SWAT was called to the scene after a high speed chase with local PD that led to the suspect wrecking his car in an alleyway and fleeing into a building. To go in after the suspect SWAT was called in. There were several ideas I wanted to convey. One was that the entry was already underway, but not by much. Through this I hoped to get the player in the mode that it was time move out right off the bat. I showed this mission was underway by using doors that already looked like they had been breached and by having them already open. Next I placed two of the SWAT team members inside the first room waiting on the lead. To further show that things were underway I placed two light sticks in the first room to signify that the room was ready to go. Once this was done it was a matter of laying out the path the player would take to complete the mission. I had several elements to the layout that I wanted to include. First I knew I wanted to have an area with which the SWAT team didnt expect to encounter. This took the form of the tunnel in the basement the enemies made to get into the caved in portion of the old subway area and setup their out of the way base of operations. Normally, of course, the tunnel would be concealed but the suspect in his panic left the entrance uncovered. The second element I knew I wanted to incorporate was more use of the teams flashlights than was used in the official game. I wanted to try and convey the idea that the team was walking into something unknown. As apart of this I used minimal lighting and made sure that the reason behind it was logical. Thus I came up with the idea that portable and easily powered lights would be used. In this case that took the form of caged construction lights and lanterns powered by small generators and kerosene. Since the SWAT environments should be as realistic as possible I made sure, whenever possible, that each construction light had a cord running to a generator. Finally I knew that I wanted to make sure the player understood what the enemies had done so I had one section where the player moves through part of the old subway tunnels and sees for themselves exactly where they are and what has happened. Also with this in mind I wanted to make sure that the caved in portion of the main and platform areas had distinct visual clues that a cave in had occurred. I showed this by having large amounts of dirt piled to the ceiling as if it had moved in and stopped short of covering the whole area. Once all of this was decided it was just a matter of putting it to paper to get the Unreal units right so I would know my brush sizes right when I sat down to the editor and thus didnt have to waste anytime starting the map. In a game like this I also write the mission text at this point (but dont enter it into the game yet) to help keep me on track as to what goals I am building towards and need to support. Building Process 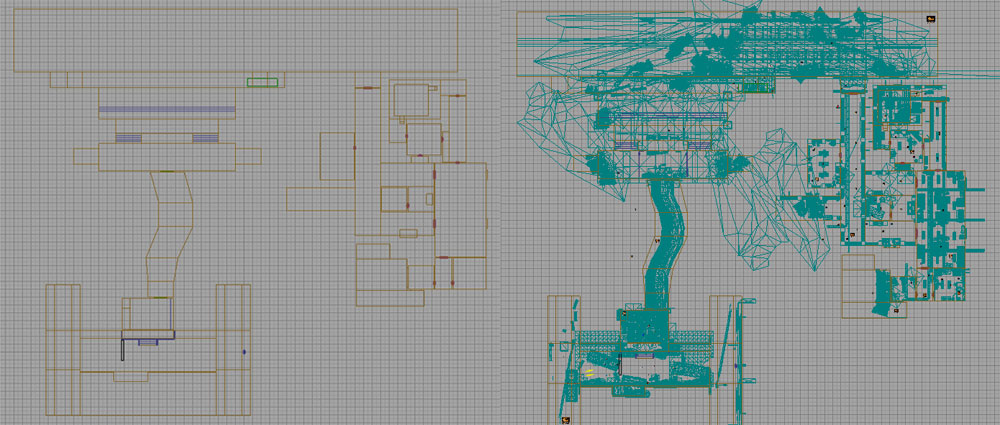 Since the Unreal 2 engine uses zones that is the first thing I make sure I account for in the layout to ensure it will work in the building process before- I get very far in putting the level together. No one cares how good looking or cool a level is if it runs poorly. Therefore with this engine I make sure that the player is not looking into to many zones at once. After studying the layout for this I block out the level with brushes to get an idea of how the level will flow but also, and just as important, get a sense of the scale of the level. I do the latter by placing a few of the static meshes that I know I will be using in the map. Since in this map I mainly used stock meshes and textures I have already gone through all of the packages and placed them in a separate map I use so I always have them on hand and do not have to search for them again. Once the meshes are in place I edit vertices on my brushes as needed to get things as tight as possible. After the brush work is done I begin the first run through of dropping in static meshes. The first run is placing the structural meshes. In a realistic map, like this one, I try to account for everything that needs to be supported in a logical fashion such as columns, beams, lights, etc. In the second run I place the detail. Again, in a realistic map like this things have to be placed in a way that they make sense. For instance in the entry and the end of the tunnel I placed tools, broken tile and cement blocks as well as dirt and puddles of water. Lastly the enemies spawn points had to be placed. In order to add to the replay ability many spawn points were placed so each time the player played the map the enemies would not be in the same place. Plus the two mission specific goal NPCs had to be setup so that they always spawned somewhere in the map. Pathnodes are also placed in this phase. For this game a lot of time and testing had to be done to ensure that the team had plenty of room to stack up and enter rooms logically and without getting stuck or moving in an unwanted direction. After I have added all of the meshes and am satisfied with them I begin the lighting process. Lighting Process 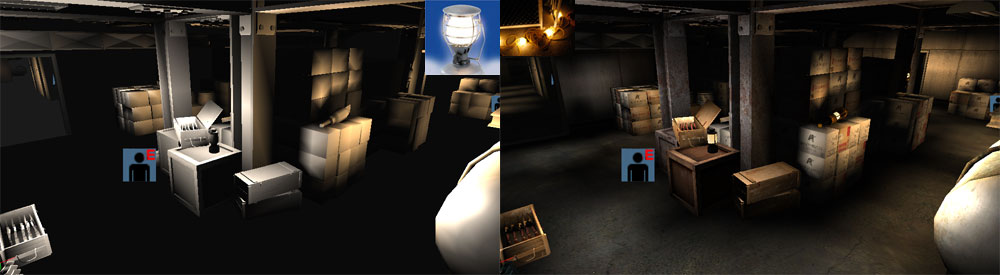 The first step in the lighting process was to find actual light examples that were comparable to the in game static meshes and use those as a base for the lighting. Even in a game like SWAT 4 where realism is the goal some artistic license is needed in order to calm lit areas so that the player isnt distracted by the lighting and thus fail to give his full attention to playing the game. In the above examples the realistic image, the lantern looks as if it gives off a white light but because of the different environments that light reflects off of rarely (if ever) is visible light truly white. So for the example in the game I made the lantern light slightly off-white as well as softened it up as the there are no real materials on which it shines that would cause a particularly bright refection. Also, unlike the construction lights, I used one light actor for each lantern and curtailed its radius (more than it normally would be) in order to account for the other lanterns in the vicinity which together would make the area much too bright. I also used the same light settings for each of the lanterns light actors to mimic the round shape of the glass which would illuminate the area around it 360 degrees and to keep their brightness consistent. For the caged construction lights I chose to use a softer shade of yellow rather than the very sharp yellow as seen in the real image to provide a more smooth transition between it and the lantern light. Also using a more harsh yellow light as seen in the picture would make the environment appear a bit foreign for the player as they would be playing in a now mostly yellow world so I softened this up as well. Lastly I made sure I accounted for materials in the environment that would have a stronger reflection value than others. For instance in the in-game picture above the water tank in the lower right hand corner, while rusty, is metal and would therefore shine more than say the card board boxes that surround it. My default lighting setup for the construction lights was two subtle lights near the light source and two brighter lights further away depicting the cone of light such a source would produce. In the case of the water tank I used two more light actors in order to create the shine. As with all of my levels I made sure that anything that looked like it would give off light actually did give off light even if it didnt dramatically affect the scene. Light sources need to be accounted for or the player may be pulled out of the experience by noticing such an inconsistency. Final Steps  In the final steps I place sounds, add the special game extras such as mission text or just getting a description and screenshot ready for an in-game map browser. I do all of this last because in the other steps something is bound to go wrong or simply not act/work the way you thought it would. So adding sounds and the other features before those things are addressed just adds more things to get in your way. While I start out with a very solid plan and goal I know I must always be flexible when a building a map. Whether working in a team or solo things rarely turn out exactly as you planned. Also you have to adapt to feedback you receive from others. This usually takes the form of players in the community who will test your maps and of course people in your team. I find the latter feedback quite helpful as it always helps to have a fresh pair of eyes that are working toward the same gameplay goal as you. |